In my previous blog post I outlined how to configure TeamCity to build SQL Server Integration Services projects and then package the ispac file into a NuGet package.
In this post I’m going to show how I set up Octopus Deploy to deploy the ispac to SQL Server 2012 and configure SSIS DB projects and environments.
Deployment Overview
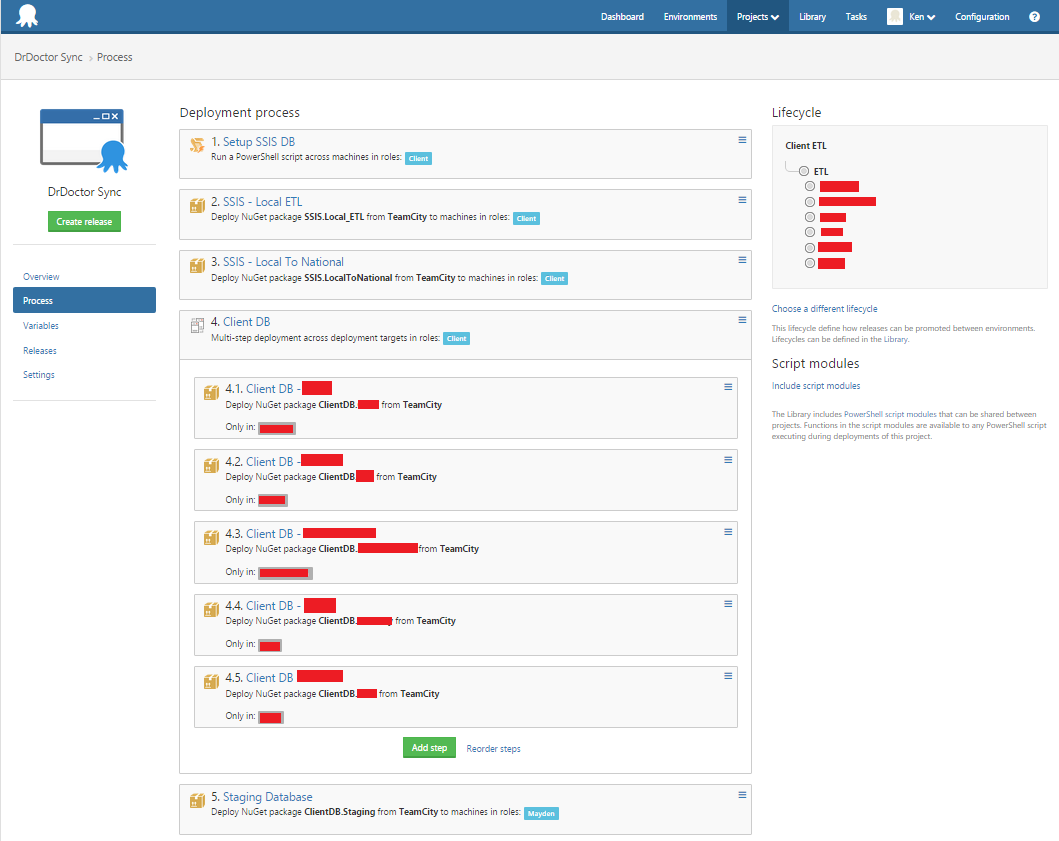
Here is an overview of the process as is currently defined in Octopus Deploy.

We are doing multi-tenanted releases for this project, which is why the Client DB (Step 4) is repeated multiple times. In a future post I’m going to cover off details about how we are doing multi-tenanted releases.
Setting up SSIS DB
The first step in the release process is to ensure that the SSIS DB is up to date for use with our SSIS projects, within this step we ensure that:
- A project folder exists within SSIS DB for our ispac to be deployed into
- An environment exists
- Environment variables are up to date
All of this is achieved with a little bit of PowerShell
 1
 2
 3
 4
 5
 6
 7
 8
 9
10
11
12
13
14
15
16
17
18
19
20
21
22
23
24
25
26
27
28
29
30
|
$folderName = $OctopusParameters['SSISDB FolderName'] $environmentName = $OctopusParameters['SSISDB EnvironmentName']

$loadStatus = [Reflection.Assembly]::Load("Microsoft.SqlServer.Management.IntegrationServices, Version=11.0.0.0, Culture=neutral, PublicKeyToken=89845dcd8080cc91")

# Store the IntegrationServices Assembly namespace to avoid typing it every time $ISNamespace = "Microsoft.SqlServer.Management.IntegrationServices" Write-Host "Connecting to server ..." # Create a connection to the server $constr = "Data Source=localhost;Initial Catalog=master;Integrated Security=SSPI;"

$con = New-Object System.Data.SqlClient.SqlConnection $constr

# Create the Integration Services object $ssis = New-Object $ISNamespace".IntegrationServices" $con

if ($ssis.Catalogs.Count -eq 0) { Write-Error "SSISDB doesn't exist" throw "SSISDB doesn't exist" }

$cat = $ssis.Catalogs["SSISDB"]

if ($cat.Folders[$folderName] -eq $null) { Write-Host "Creating new folder" $folderName $newfolder = New-Object $ISNamespace".CatalogFolder" ($cat, $folderName, "Description") $newfolder.Create() }

$folder = $cat.Folders[$folderName]

if ($folder.Environments[$environmentName] -eq $null) { Write-Host "Creating environment" $environmentName $newEnv = New-Object $ISNamespace".EnvironmentInfo" ($folder, $environmentName, "Descriptoin") $newEnv.Create() }

$env = $folder.Environments[$environmentName]

Write-Host "creating variables"

if ($env.Variables["Local"] -eq $null) { $env.Variables.Add("Local", [System.TypeCode]::String, $OctopusParameters['Client - Local Conn String'], $false, "Our local client db") } else { $env.Variables["Local"].Value = $OctopusParameters['Client - Local Conn String'] }

# create other environment variables here...

#save changes to environment
$env.Alter()
|
(NB: This script and the subsequent one for deploying the ispac are based off this example by Matt Masson)
I’ve tried to write this script to be idempotent so that it can be run multiple times without causing any problems.
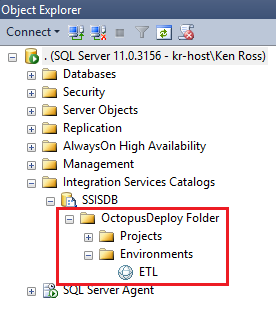
Here is what you will see in SQL Management Studio after this step has run:

Deploying SSIS Projects
The next step is to actually deploy the Integration Services project into the SSIS DB. In this step we use a PowerShell script to:
- Deploy the ispac into the project folder that was created in the previous step
- Ensure that the project has a reference to the environment that was created in the previous step
 1
 2
 3
 4
 5
 6
 7
 8
 9
10
11
12
13
14
15
16
17
18
19
20
21
22
23
24
25
26
27
28
29
30
31
32
33
|
### Static Variables

$localToLocalETLFullPath = ".\\DrDoctorClientETL.ispac" $folderName = $OctopusParameters['SSISDB FolderName'] $environmentName = $OctopusParameters['SSISDB EnvironmentName'] #the projectName needs to match the output name that has been specified on the project, you can see this in the properties in SQL Server Data Tools $projectName = "DrDoctor Client ETL"

###

$loadStatus = [Reflection.Assembly]::Load("Microsoft.SqlServer.Management.IntegrationServices, Version=11.0.0.0, Culture=neutral, PublicKeyToken=89845dcd8080cc91")

# Store the IntegrationServices Assembly namespace to avoid typing it every time $ISNamespace = "Microsoft.SqlServer.Management.IntegrationServices" Write-Host "Connecting to server ..." # Create a connection to the server $constr = "Data Source=localhost;Initial Catalog=master;Integrated Security=SSPI;" $con = New-Object System.Data.SqlClient.SqlConnection $constr # Create the Integration Services object $ssis = New-Object $ISNamespace".IntegrationServices" $con $cat = $ssis.Catalogs["SSISDB"] $folder = $cat.Folders[$folderName]

Write-Host "Deploying project ..." [byte[]] $projectFile = [System.IO.File]::ReadAllBytes($localToLocalETLFullPath) $folder.DeployProject($projectName, $projectFile)

#####

Write-Host "adding reference to environment"

$project = $folder.Projects[$projectName] $env = $folder.Environments[$environmentName]

if ($project.References.Count -eq 0) { $project.References.Add($env.Name, $folderName) } else { Write-Host "assuming that the correct environment has been configured" }

####

Write-Host "applying environment variables to project"

$targetVar = $env.Variables["Local"] $sourceVar = $env.Variables["Source"]

Write-Host "Updating Extract package parameters"

$extractPackage = $project.Packages["Extract.dtsx"]

$extractPackage.Parameters["CM.Target.ConnectionString"].Set([Microsoft.SqlServer.Management.IntegrationServices.ParameterInfo+ParameterValueType]::Referenced, $targetVar.Name) $extractPackage.Parameters["CM.Source.ConnectionString"].Set([Microsoft.SqlServer.Management.IntegrationServices.ParameterInfo+ParameterValueType]::Referenced, $sourceVar.Name)

$project.Alter()
|
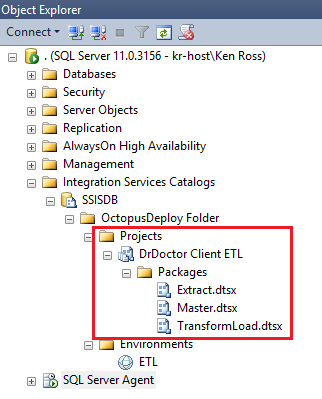
After this step has run the Projects folder will contain the first of our SSIS projects:

Deploying a database project
In a previous blog post I showed how you can fiddle with the dtproj and add a reference to the Octopack NuGet package to have TeamCity turn your database project into a NuGet package for you.
However, since discovering how to use NuSpec files in TeamCity I’d now recommend against changing your dtproj file and instead moving to using a NuSpec to define the package.
Here is a sample NuSpec file that I started using this week
 1
 2
 3
 4
 5
 6
 7
 8
 9
10
11
12
13
14
|
<?xml version="1.0" encoding="UTF-8"?>
<package xmlns="http://schemas.microsoft.com/packaging/2010/07/nuspec.xsd">
   <metadata>
      <id>ClientDB</id>
      <version>1.0.0</version>
      <authors>DrDoctor</authors>
      <requireLicenseAcceptance>false</requireLicenseAcceptance>
      <description>Client database</description>
   </metadata>
   <files>
      <file src="bin\Release\ClientDB.dacpac" target="ClientDB.dacpac" />
      <file src="bin\Release\Reference.dacpac" target="Reference.dacpac" />
   </files>
</package>
|
(You can adapt this as you need for your requirements)
As shown in my previous post on building SSIS projects in TeamCity you will need to add this NuSpec file the list of packages to build within the NuGet Packaging step to have TeamCity build the NuGet package.
Once TeamCity is building the NuGet package, we can add a new Deploy NuGet Package step in our Octopus Deploy project, with the follow PowerShell script as a custom deployment script.
Here is the PowerShell script which will generate an upgrade script using SqlPackage.exe
1
2
3
4
5
6
7
|
$dbName = $OctopusParameters['Client Staging DB'] $server = $OctopusParameters['National DB Server']

$releaseNumber = $OctopusParameters['Octopus.Release.Number']

& 'C:\\Program Files (x86)\\Microsoft SQL Server\\110\\DAC\\bin\\SqlPackage.exe' /Action:Script /OutputPath:Upgrade.$dbName.$releaseNumber.sql /SourceFile:DrDoctor\_STG.dacpac /TargetServerName:$server /TargetDatabaseName:$dbName /p:IncludeCompositeObjects=true

New-OctopusArtifact -Path "Upgrade.$dbName.$releaseNumber.sql"
|
This will compare the dacpac to the database, if the database doesn’t exist then the upgrade script will create it, otherwise the upgrade script will contain a bunch of sql commands to upgrade the database to match the dacpac.
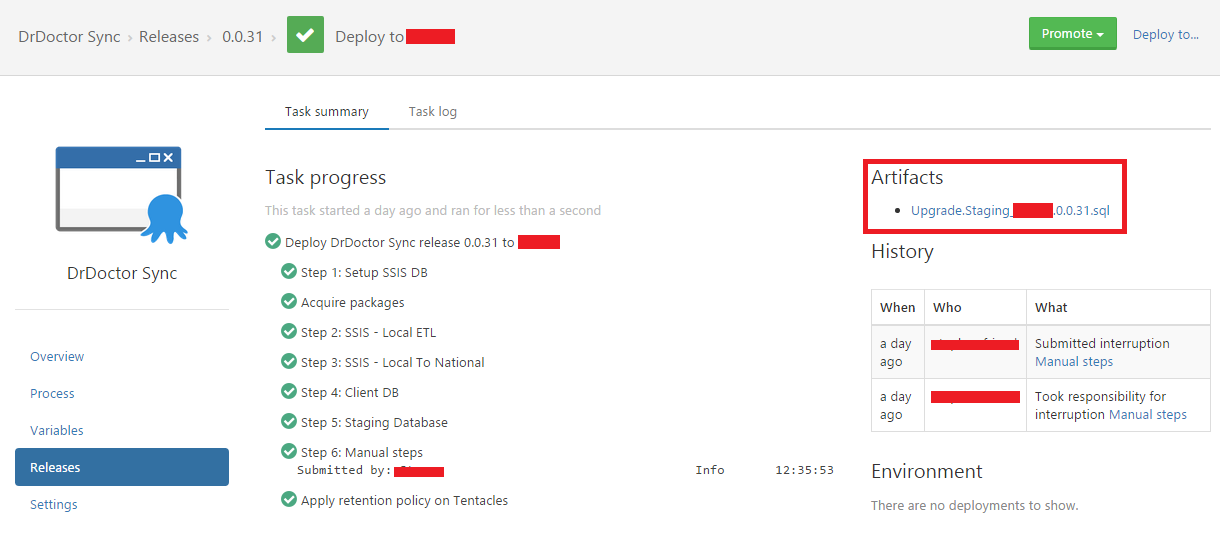
The New-Artifact command is a useful Octopus Deploy function that tells the tentecle to grab the file and make it part of the release, so it’s then available from within the Octopus Deploy web ui.

Alternatively, if you’re game you could configure SqlPackage to automatically upgrade the database by using Action:Publish instead.
In the next blog post I’ll be covering multi-tenanted releases with Octopus Deploy and using the Offline Package Drop feature which was new in 3.0.
Disclaimer: the PowerShell could definitely do with some tidying up, don’t hold that against me :)


🍪 I use Disqus for comments
Because Disqus requires cookies this site doesn't automatically load comments.
I don't mind about cookies - Show me the comments from now on (and set a cookie to remember my preference)